Weblium Product Updates #November 2019
We’re excited to inform you about all the improvements we made in November.
A short summary: from now on, you can purchase a PRO subscription via PayPal without having to add it as a payment method option in the Account settings, send email addresses from submitted contact forms directly to your Mailchimp account, add Apps Buttons to your site, add links to your Terms of Use in the contact forms, highlight tabs with custom colors, and even more.
Stay tuned, and we’ll explain what our new features are about and how they work so that you can instantly implement them on your site.
We’ve also included an important note about changes to our free subscription. If you’re a free Weblium user, please take note.
Moreover, this blog post includes a beneficial perk for those of you who have been waiting for a calendar feature. At the end of the article, there is a calendar features survey that you can use to request the desired calendar functionality.
Let’s get to the bottom of exactly how our new features can be used to your advantage.
Contents
PayPal tab on the checkout page
We agree that PayPal is one of the fastest, simplest, and most secure ways to make online purchases or recurring payments. We’ve done our best to let you connect your PayPal account in just a few clicks.
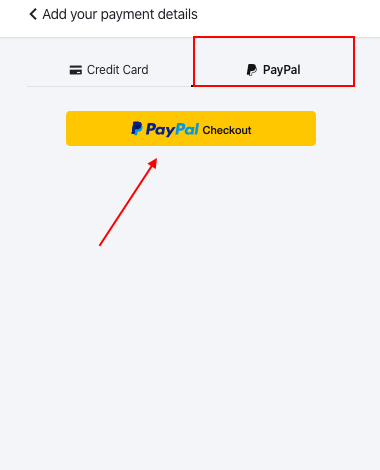
From now on, you don’t need to add PayPal as a payment method in the Payment Settings or request our support to help you connect your PayPal account. You will have the PayPal tab on the checkout page by default.
To pay via Paypal, click on the Upgrade button, navigate to the PayPal tab, tap the PayPal checkout button, and enter your email or phone number.
If you’ve already connected your card as your primary payment method, read this handy article to figure out how to change it.
Mailchimp integration with contact forms
Here we have exciting news for current Mailchimp users or for those Weblium creators who are going to grow their businesses with Mailchimp email campaigns.
First things first: Mailchimp is an email marketing service that you can use to create email campaigns and newsletters, manage mailing lists, and more.
From now on, you can automatically add your form submissions to subscriber lists in your Mailchimp account. You don’t need to collect leads manually or download them from one online service and then upload them to your Mailchimp account. Setting up a Mailchimp integration will take you a few minutes, but if you do it once, it will serve your business for years to come.
If you don’t have a Mailchimp account but would like to get started with email campaigns, this link may become your starting point.
If you’ve already used Mailchimp for your email marketing activities, let’s walk through how you can set up Mailchimp integration with your contact forms.
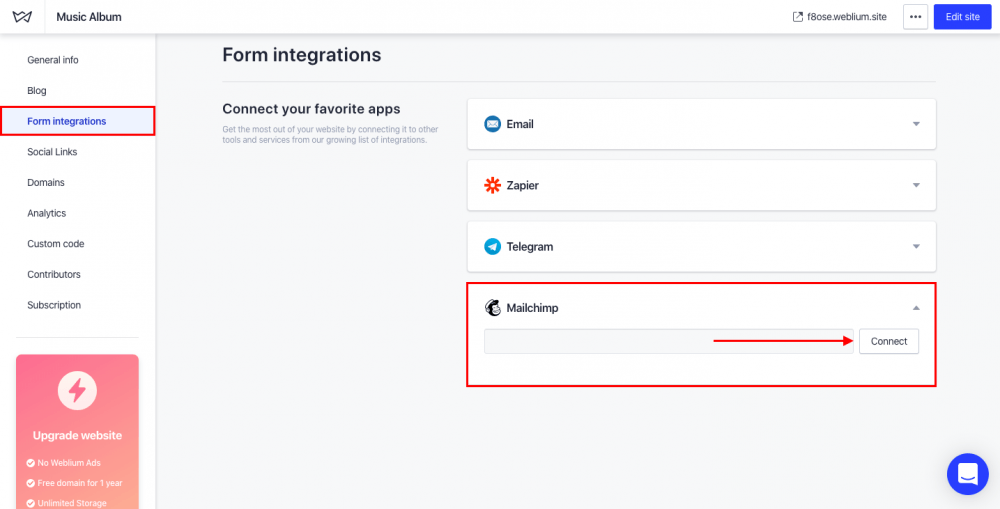
- Go to the Form integrations tab in the Site Settings.
- Navigate to the Mailchimp integration tab and click on the Connect button.
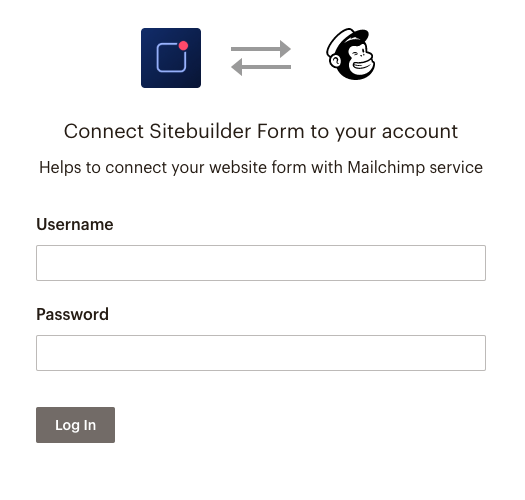
After that, you’ll land on the Mailchimp login page. Enter your username and password in the login form to connect a form with Mailchimp.
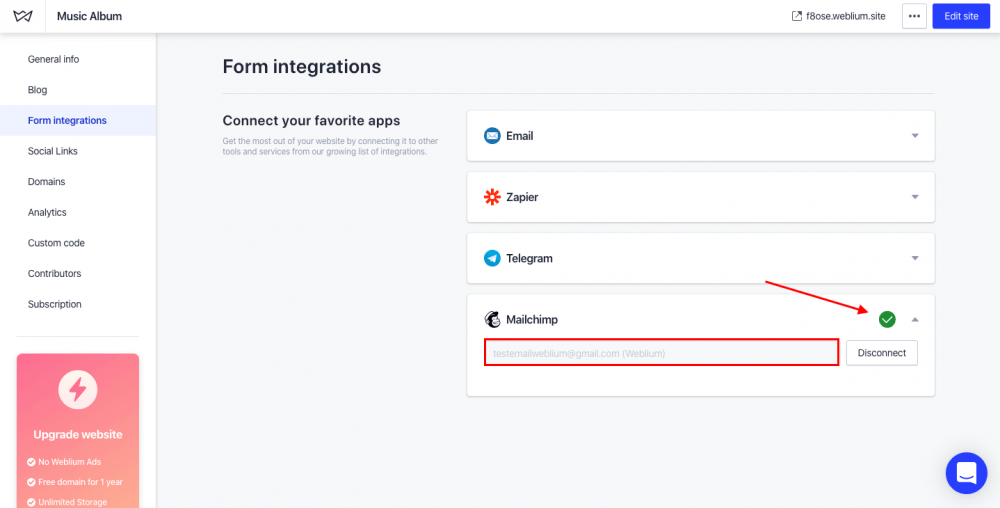
If you log in to Mailchimp successfully, you’ll see a green checkmark in the Mailchimp integration tab and find your email for Mailchimp translucent in the email address field.
Instead of the Connect button, you’ll have the Disconnect button in the Mailchimp integration tab. You should press it when you want to stop integrating your Mailchimp account with Weblium.
- Add a contact form to your site.
- Click on the “gear“ icon on the form to open the Form Settings.
- Add an email field to the contact form. If you don’t create an email field, Mailchimp integration won’t work.
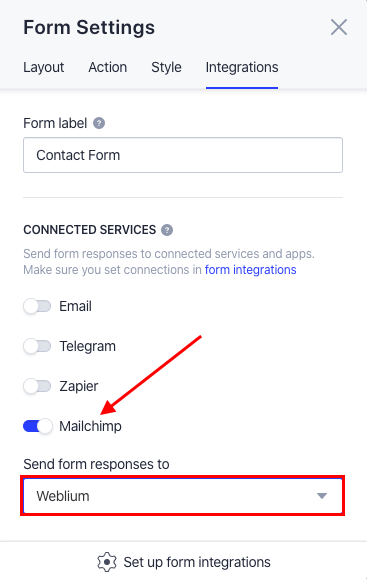
- Navigate to the Integrations tab.
- Enable Mailchimp integration and put down the name of a Mailchimp audience from the dropdown menu.
Once that’s done, publish your site to save changes and enjoy our new integration.
Here is a tip: you can collect email addresses through multiple forms on your site. If you have a few contact forms on one website, you can create multiple Mailchimp audiences and name them differently. Thanks to this feature, you won’t confuse email addresses received from the various contact forms.
Here is a video guide for visual learners.
Also, here is a more detailed guide to connecting Mailchimp to a contact form.
By the way, the ability to send information from other contact forms’ fields is coming soon.
Apps Buttons element in a custom block
This element is the most long-awaited by Weblium creators who have app promotion sites. From now on, you can add the AppStore and GooglePlay buttons to your website in a few clicks.
Check out this video tutorial about the Apps Buttons element.
To add AppStore and GooglePlay buttons to your site, take the following steps.
- Add a custom block to your site and choose Apps Buttons element from the variety of items in the custom block. Feel free to add this element wherever you want within the custom block.
- To customize Apps Buttons, go to the App button settings by clicking on the “gear“ icon on the AppStore and GooglePlay buttons. Consider that each button has its settings, so it should be customized separately.
- In the Style tab, you can choose the App Button type and size.
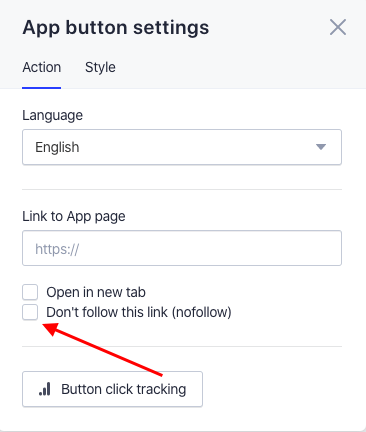
- In the Action tab, you can change the language of the button choosing from 10 languages available, add a link to the App page, and set up Button click tracking.
If you actively use GoogleAnalytics, pay special attention to the Button click tracking feature since it’s an essential tool for building online sales funnels on your site and tracking their performance.
Here is a detailed guide to setting up Button click tracking on a Weblium site.
If the primary goal of your site is traffic generation to your AppStore and GooglePlay pages, feel free to place your Apps Buttons in the first and last blocks on your site. Your site visitors will tap these buttons upon landing on your website or after reading information about your product/service.
Here is a tip: avoid using a nofollow tag on the links to your AppStore and GooglePlay pages to improve your App Store & Google Play optimization.
Check this complete guide to adding Apps Buttons to your site.
Updated Form settings
We’ve made a couple of improvements in the Form settings that you might not notice at first glance, but you’ll like them after using them for a while. With these alterations, the use of contact forms will become even more intuitive and convenient
Let’s take a look at them one by one.
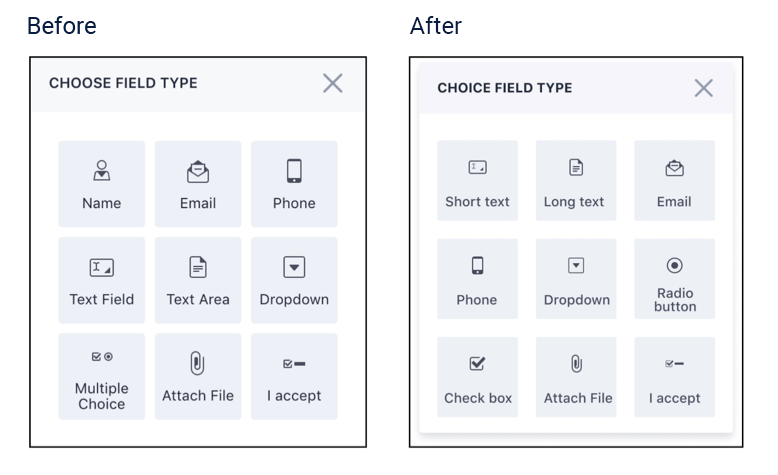
- We’ve changed some field types so that they will suit the needs of more Weblium users. We’ve combined the Name and the Text fields into one field–Short text– and separated the Multiple choice field into two fields: Checkbox and Radio button.
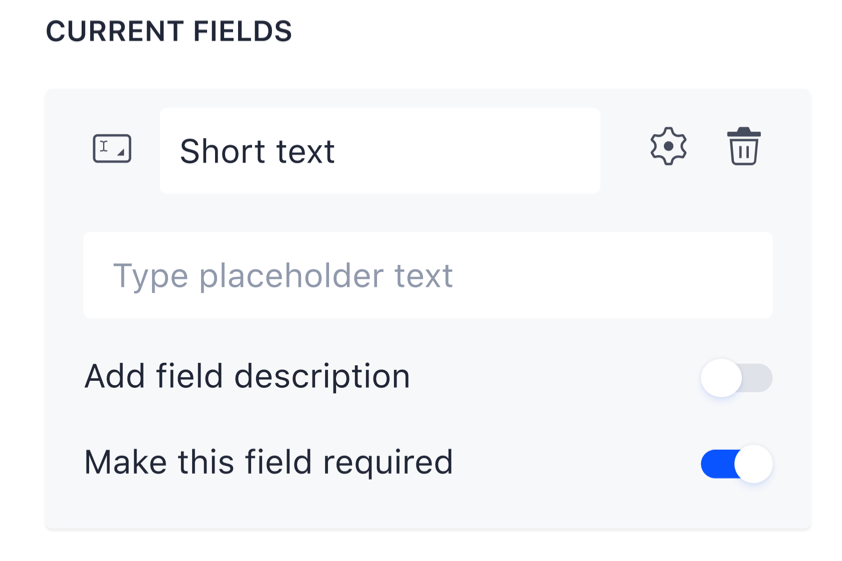
- Form settings have become more compact and clean so that you don’t need to open the dropdown menu to change the name of the field. As you’re customizing the contact form, you will always see the type and the name of the edited field. At the same time, though, the field description will appear only after toggling it on.
- We’ve spruced up our contact forms by removing redundant field labels so that you can concentrate on the copies in your forms for the highest performance.
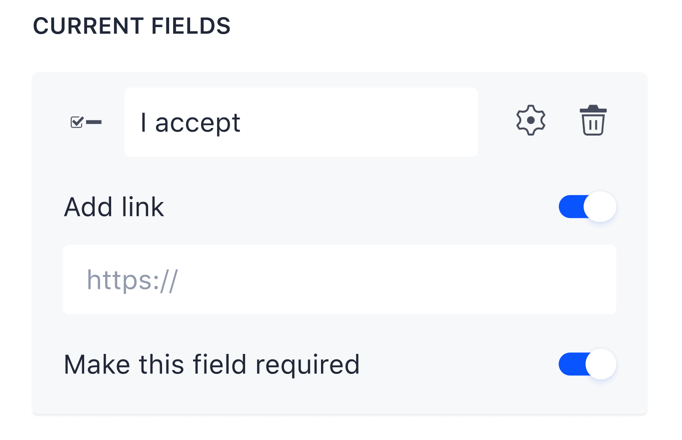
- From now on, in the “I accept“ field, you can add URLs to your Terms of Use or Privacy Policy. You can make this field required and be sure that you’re collecting user data with their agreement.
- We’ve added a smooth fade in and fade out effect on thank you pages so that your site visitors will have a better experience.
Tabs update
These mini improvements will become significant benefits with time. They are like icing on the cake, created to make your tabs even more visually appealing.
From now on, you can highlight the active tab with your custom colors to make your site visitors concentrate on this particular tab. To take advantage of our new accent color update, go through these steps.
1. Add a pre-made block with collections or add a collection item in the custom block yourself.
2. Open the Collection item settings, navigate to the Modes tab, and opt for the Tabs mode.
3. Go to the accent color settings. Choose a color from the placeholder color palette, use an eyedropper to highlight the tab with a custom color, or enter the custom hex color code.
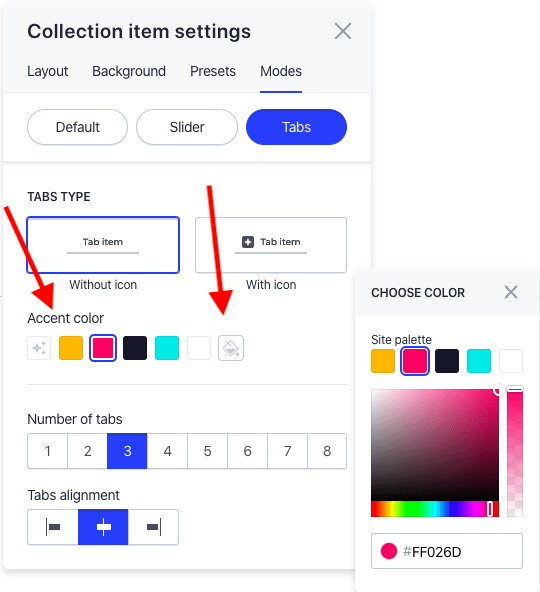
4. Publish your site and try this update in action. Once you’ve customized your tabs with color, your active tab will always be highlighted with your custom colors.
Check out the video review of this feature.
The second Tabs improvement relates to more convenient navigation on the mobile version of your site. An active tab in a collection block will be centered once your site visitor clicks on the tab.
Here is a short video of how it works.
New eye-catching templates
We’ve created 7 new, professionally pre-designed templates that are ready to become drafts for your future sites. They’re marked by a New sign and placed at the beginning of the list of Weblium templates.
They are designated to be the perfect fit for life coaches, makeup artists, owners of camping clubs, or architecture firms. However, if you have no connections to any of these business niches but like the design of the templates, feel free to configure them as you wish.
By the way, do you remember that there is always an option to start building a site from scratch? To do so, click on the Create new button in the upper right corner in the editor.
This will take you to a list of templates, where you’ll see + Create a blank website button. Tap on it and add whatever blocks you need.
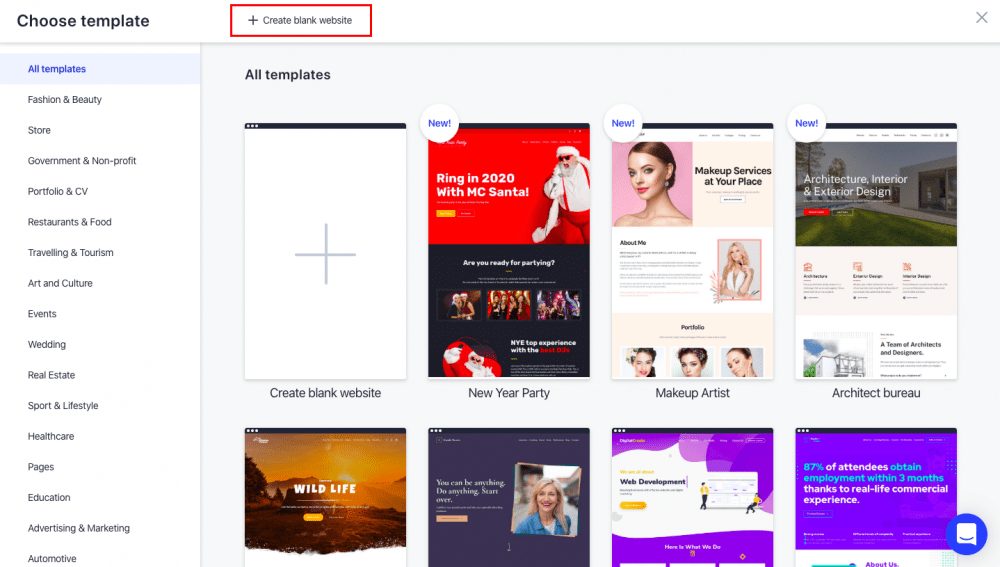
Note that your site necessarily requires header and footer blocks, so ensure that you add these blocks to your site before publishing.
Moreover, did you know that you can request a pre-designed template for your niche by contacting our support at support@weblium.com? We just might choose your template idea, among many others. If that happens, our Weblium Studio will be glad to deliver the requested template directly to the Weblium editor.
Let us show these templates to you.
From 10 to 3 free sites
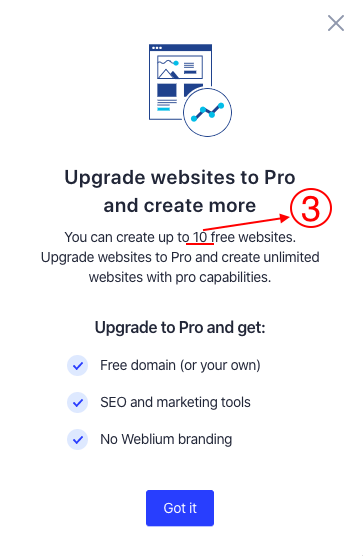
Here is an important note to take into account. We’re reducing the number of free websites available in the editor for new Weblium users. They will now be able to create up to 3 free sites.
There won’t be any considerable change in the editor interface. The only difference new users will see is a number 3 instead of a number 10 in the window that pops up after they click on the Upgrade button.
If you’ve already created more than 3 sites, they will remain in your account, but you won’t be able to create more websites without upgrading at least one site to PRO.
Calendar features survey
We’re working on a roadmap for the calendar feature. Could you give us some insights about how you wish to use the calendar functionality, what settings you would like to have in the calendar, along with what you expect from this feature in the future?
Are you ready to spend 5 minutes to get the custom calendar feature?
Submit this short survey to help our upcoming release be created just for you.
We’ve done our utmost to exceed your expectations with our November updates. We hope we’ve done so. Try our new features right now since they are freshly made with you in mind.