Weblium Product Updates #October 2019
Our developers went beyond all limits and expectations this month. They’ve released record-breaking 10 updates.
Be sure that they will help you customize your site with new block elements, upgrade existing site items, and even gain more prospects. So let’s start diving deeper into Weblium improvements/your benefits.
Contents
Blog App Updates
If you haven’t heard yet, we’ve released the most-awaited feature—blogging functionality. We couldn’t wait until now to inform you about this news in the monthly product updates, so we’ve already published an article about the blog feature. Check it out at the link. But since the blog post was published, we’ve considerably improved the Blog App. Take a look at what we’ve done.
Feed rows management and new Blog feed styles
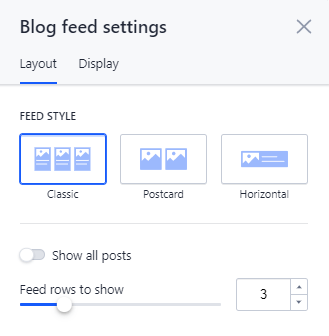
From now on, you can regulate the number of blog posts in the Blog Feed or display all the posts you have in this block. You can choose the Feed style from Classic, Horizontal, and Postcard options and customize it yourself.
To see this feature in action, take the following steps.
- Add the Blog Feed to your site.
- Create as many blog posts as you want.
- Go to the Blog feed settings and navigate to the Layout tab.
- Enable Show all posts button if you want to display all posts in the Blog feed or set the needed number of feed rows by moving a slider.
- Click on the Classic, Horizontal, and Postcard feed styles and choose the one that fits your site’s design best.
Delete blog button
Earlier on, you could delete only the whole page with the Blog feed. However, it’s obvious that you may need other blocks on this page, besides the Blog feed. We bet that tens of lines of code were written so that you could delete the Blog App in one click and have other blocks on the page. Finally, we’ve nailed it.
Take these steps to delete the blog.
- Go to the Site Settings and navigate to the Blog tab.
- Open the Setting tab bar and click on the Remove blog button.
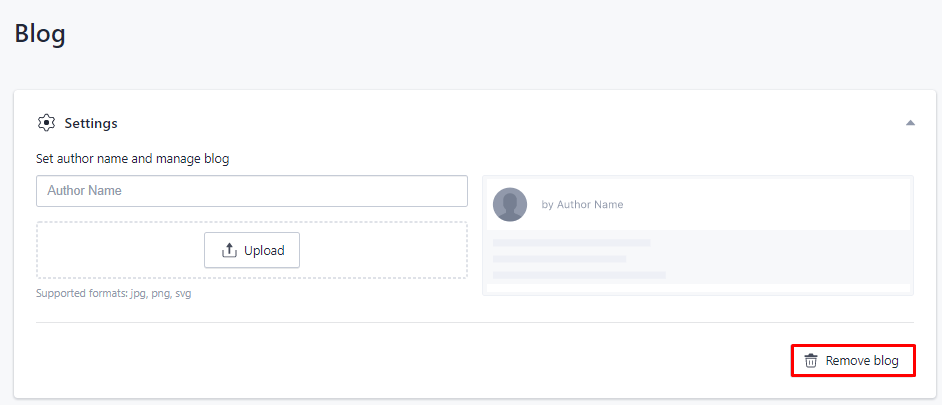
Don’t worry if you click on the Remove blog button by accident or change your mind about deleting the Blog App. All data will be kept so that you can re-install the blog with all blog posts at any time.
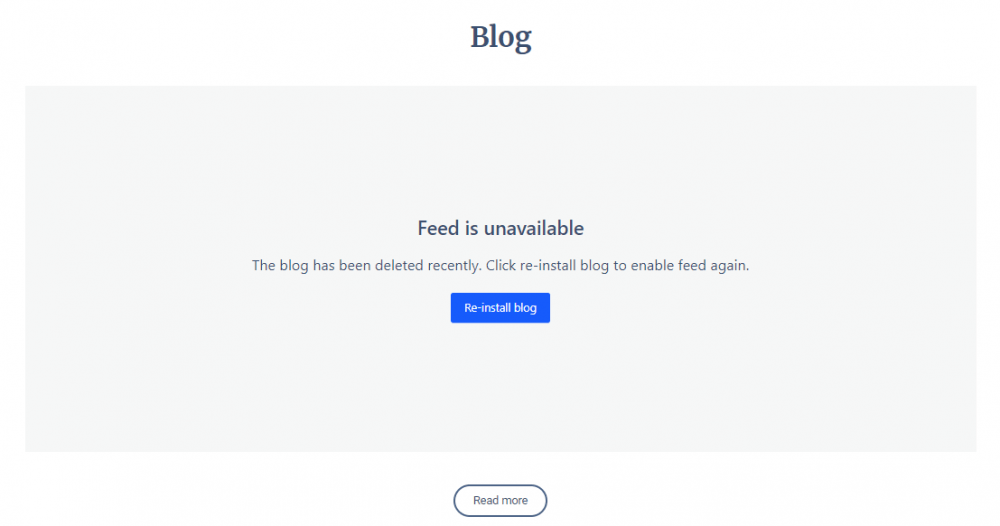
After deleting the Blog App, you’ll see this message but still, have the Page with Blog feed on your site.
Aspect ratio fix for preview images
As you might remember, the recommended aspect ratio for the preview blog post images is 2:1, and supported formats are jpg and png. But we’ve done our best so that you don’t have to adjust preview images to our aspect ratio requirements each time you upload them.
Now if your preview image has an aspect ratio of 4:3 or 16:9, you don’t need to change it to 2:1. It won’t be cropped; however, keep in mind that it’s better to do so in order to have a consistent blog post design.
Do remember that you can change the image aspect ratio in free online image editors like Canva or Crello in a few minutes, so it isn’t as difficult as it seems.
URL editing
The dreams of Weblium users who change the titles of their blog posts a few times per month have come true. Now you can edit the blog posts’ URLs while changing the names of the blog posts.
If you’ve requested this update, your command has been implemented. Test it in the Weblium editor.
- Click on the Edit post button and go to the Settings tab.
- Type a new URL path in the Post URL field.
- Publish your site to see the changes in action.
Keep in mind that the titles don’t have to match the URLs 100%, but we highly recommend having your title keywords in the URLs. By doing that, you’ll get a better chance of being ranked high on Google.
Furthermore, the URL editing feature will be improved soon. Now we’re working on the redirect functionality, so don’t miss it out on our next product updates.
Integrations set-up control by AI Design Supervisor
Weblium AI Design Supervisor stepped in to deliver this feature so that you don’t forget to pursue your site’s main goals—attract site visitors, convert them into leads and, in turn, boost sales.
From now on, our AI Design Supervisor will tell you what integrations you need to set up and where you can connect them. After adding a contact form to your site, you’ll see red alert icons near unused integrations. These triangles are a kind reminder from our AI Design Supervisor about setting up connected services and apps to make a contact form fully-functioning.
You’ll see this alert icon if you:
- don’t add any integrations to the contact form;
- enable integration in the Form Settings but do not connect it in the Form integrations.
- set up an Email integration in the Form Settings and the Form integrations but don’t choose recipients’ emails.
- integrate Zapier but don’t choose Zapier connection, or your Zapier account is deactivated.
New elements in custom blocks
Accordion element
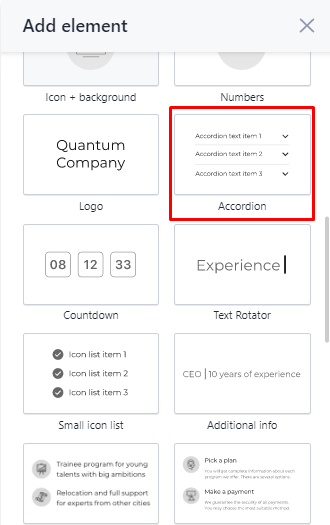
This is a useful element for designing the Q&A block. Have you had an issue when you needed to give detailed answers in the FAQ block? However, you understood that it wasn’t the greatest decision to write millions of text lines in one block. If this has happened to you, check out our Accordion element, which is likely to solve your pain point.
Add the Accordion element to the site and make it a great fit for your site design. Change the control types by choosing icons plus/minus or rows up/down, and set decorators or presets.
Quote element
Many Weblium users have requested the quote element. You’ve probably had the idea to showcase testimonials in the format of the quote as well. Our users’ wish is our command. In October, we worked our hearts out to deliver this element directly to the editor.
From now on, you can add the Quote element to the Custom blocks or opt for pre-made blocks with the Quote element in the list of blocks. Just search for them with these names: wireframe-series-1-quote, wireframe-series-2-quote, or wireframe-series-3-quote.
In the Quote Settings, you can choose the Quote type and Quote options. You don’t need to change the block content while switching from one Quote type to another so you can do it to refresh the design of the quote or make two quote elements on your site look different.
Image + Card element
The Image + Card is our favorite element among all of the freshly-baked ones. It can be used to design the blocks with descriptions, product items or speakers in an interesting way.
You can add the Image+Card element to the custom block and customize it however you want. In the Block Settings, you can choose ready-made presets or even add the text to the picture without Photoshop or any other image editors.
Moreover, you can choose pre-designed blocks with the Image+Card element. Click on the Add block button and type wireframe-series-11-projects or wireframe-series-14-team in the search bar.
No need to say any more—see it in action.
List element update
Wow! Just look at this one! The list element has become completely customizable. With the latest update of the list element, you can spruce up your blocks with pricing plans, requirements, or partners’ offers.
Choose a list element from the variety of custom block elements and customize it to your heart’s content. You can edit the list by adding new elements both horizontally and vertically, choosing style options for background, or regulating the width of elements.
You can find blocks with an updated list element by typing Pricing-3 in the list of blocks.
In a nutshell, this element is undoubtedly worth your attention. Check it out in the video.
Tabs mode
Your blocks with pricing plans, menus, or job offers will never be the same. With the new incredible update—Tab mode—you can easily make them more user-friendly and visually stunning.
From now on, you can enable Tabs mode in the pre-made blocks with collections or in the custom blocks after adding collection items yourself. To discover the hottest Tabs mode feature, follow these steps.
- Click on Collection settings and navigate to the Modes tab.
- Enable the Tabs option and customize them with tabs type (with or without icon), accent color, the number of tabs, and tabs alignment.
And that’s not all! You can rename the tabs and move them within one block.
Wait a minute, what exactly is the Tab mode? Okay, enough words—make it clear with this handy video or read the full guide on how to set tabs at our helpdesk center.
Contact forms with multiple recipients
If you work on the site with your teammates or partners, they will probably ask you to keep them in the loop about your potential customers that the site brings. You can easily keep them informed by setting their emails in the contact forms so that they can receive form responses. Now it’s no big deal in the Weblium editor. Check out this five-step guide.
- Go to the Site Settings and navigate to the Form integrations tab.
- Click on the Email tab bar and tap the +Add email button. Type as many email addresses as you want to get notified.
- Start editing your site by clicking on the Edit site button at the upper-right corner of your Weblium account.
- Add a block with a contact form to your site or opt for a form as an element in a custom block.
- Open Form settings and move to the Integrations tab. Enable Email and choose email addresses that you want to send the form responses to.
11 new appealing templates
Our Template collection is growing as quick as a flash. In October, it was stocked up with 11 new templates. As always, they are a great fit for different business niches and based on best site practices. Moreover, in the previous month, our design techniques were updated with the latest cutting-edge web design trends, so you may notice a considerable upgrade in terms of the quality of the design.
Tap the Create new button to immerse yourself in the world of an unlimited choice of templates (okay, somewhat bit limited—we currently have 174 custom templates). For your easy navigation, all-new templates are marked with the New label.
- Billiard Club
- English course
- Youtube Blogger
- IT Conference
- Politician
- Music Album
- Copywriting Agency
- Ballet Studio
- Handyman
- Model Agency
- Frontend Courses
Now it’s your move. Hurry and try our new product updates. Some of them might become your favorites, and after a while, you won’t be able to imagine your Weblium experience without them.
As for now, get down to business and start creating success ripples.
Stay tuned. More astonishing releases are coming soon!
